Motivation
I was inspired by Revolution's blog and step-by-step tutorial from Jeffrey Breen on the set up of a local virtual instance of Hadoop with R. However, this tutorial describes the implementation using VMware's application. One downside to using VMware is that it's not free. I know most of the people including me like to hear the words open-source and free, especially when it is a smooth ride. VirtualBox offers an open-source alternative and thenceforth, I chose this. Most of the trouble started after a hassle free installation of VirtualBox and creation of the cloudera's demo VM. I came across different hurdles when it came to addition of VirtualBox Guest Additions, which is intended to spruce up the virtual machine by offering such features as a shared folder with the host OS. Although there are solutions, the resources are scattered and obscure. I did manage to clear these hurdles and went on to installing R and RStudio along with RHadoop packages. I thought it would be useful to self-taught enthusiasts like me if I lay out the steps in a comprehensive manner, since I have spent some time dealing with the quirks in the process.
Description
Hadoop
R and Hadoop
The most common way to link R and Hadoop is to use HDFS (potentially managed by Hive or HBase) as the long-term store for all data, and use MapReduce jobs (potentially submitted from Hive, Pig, or Oozie) to encode, enrich, and sample data sets from HDFS into R. Data analysts can then perform complex modeling exercises on a subset of prepared data in R.Revolution Analytics released RHadoop allowing integration of R and Hadoop. RHadoop is a collection of three R packages that allow users to manage and analyze data with Hadoop.RHadoop consists of the following packages:
rmr - functions providing Hadoop MapReduce functionality in R
rhdfs - functions providing file management of the HDFS from within R
rhbase - functions providing database management for the HBase distributed database from within R
Cloudera Hadoop Demo VM
CDH is Cloudera’s 100% open source distribution of Hadoop and related projects, built specifically to meet enterprise demands. Cloudera created a set of virtual machines (VM) with everything we need to make it easy to get started with Apache Hadoop. Cloudera Hadoop's Demo VM provides everything you need to run small jobs in a virtual environment. The packages have been implemented and tested in Cloudera's distribution of Hadoop (CDH3) & (CDH4). and R 2.15.0. This offers a great way to get familiarized with Hadoop.Steps...............
Platforms used in this tutorial:
Guest OS : Mac OS X 10.7.5 (Lion)Virtualization software: VirtualBox 4.2.6
Cloudera Hadoop Demo VM: CDH 4.1.1
R: 2.15.2
RStudio server for : 0.97.248
RHadoop packages: rmr 2.0.2
1. Download and install the latest release of VirtualBox (Ver 4.2.6 at the time of this post) for your platform (Here OS X)
http://download.virtualbox.org/virtualbox/4.2.6/VirtualBox-4.2.6-82870-OSX.dmg
2. Download 'Cloudera's Hadoop Demo VM archive for CDH4
(Latest: Ver 4.1.1 runs CentOS 6.2 64 bit VM)
https://downloads.cloudera.com/demo_vm/virtualbox/cloudera-demo-vm-cdh4.1.1-virtualbox.tar.gz
3. Extract 'Cloudera's Hadoop Demo VM' archive
It extracts virtual machine image file: 'cloudera-demo-vm.vmdk'
4. Copy this virtual machine image to a desired folder (eg:- folder named 'Cloudera Hadoop'). This folder and image file has to be the permanent location of your Hadoop installation (not to be deleted!)
5. We will now create a virtual machine on VirtualBox.
Open application: 'VirtualBox'. Click on 'New'.

Give a name to the VM. Here: 'Cloudera Hadoop'.
Pick type: Linux
Choose version: Linux 2.6 (64 bit)
Click 'Continue'.

It is generally recommended to allocate at least 2 GB of RAM. I recommend more, since I encountered problems installing the R package 'Rcpp' with about 2 GB of RAM. I allocated 4 GB and resolved the issue.
Click 'Continue'.
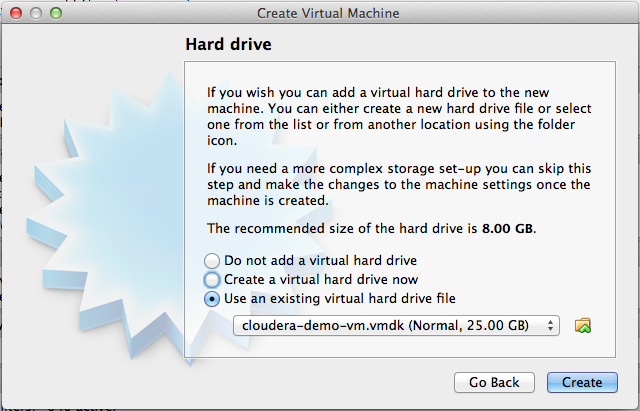
Choose the option 'Use an existing virtual hard drive file' and select the virtual image file ( 'cloudera-demo-vm.vmdk' ) saved in folder 'Cloudera Hadoop' (refer to step 4).
Click 'Create'.
6. Click 'Settings' to make a few recommended changes.

Click on tab 'Advanced' under 'General' category.

Pick 'Bidirectional' option for items: 'Shared Clipboard' and 'Drag'n Drop'

Click on 'System' category. Ensure option 'Enable IO APIC' under 'Extended Features' is checked on (This is default!)
Click on 'Network' category. Choose Adapter 1 option 'Attached to:' as 'Bridged Adapter' (This gives you access to physical wifi. Default is 'NAT')

Click on 'Shared Folders' category. You may choose to pick a folder to share with the host OS (here Mac OS X)

Click 'OK'.

Once you launch the VM, you are automatically logged in as the cloudera user.
The account details are:
username: cloudera
password: cloudera
The cloudera account has sudo privileges in the VM.

There are some prerequisites to installation of 'Guest additions'.
Run console
Switch to root user:
$ sudo bash
Update linux kernel:
$ yum install kernel -y
Reboot
Run console
Open internet browser (Firefox) and download the following file (link below):
http://rpm.pbone.net/index.php3/stat/4/idpl/18259813/dir/scientific_linux_6/com/kernel-devel-2.6.32-220.23.1.el6.x86_64.rpm.html
Click on link for file: kernel-devel-2.6.32-220.23.1.el6.x86_64.rpm
Download and save file to folder 'Downloads' under 'home/cloudera' (Either create new folder using 'Save' dialog box or use console: mkdir /home/cloudera/Downloads
Run console Install packages: $ yum install kernel-devel-2.6.32-220.23.1.el6.x86_64.rpm -y $ yum install gcc -y Link the kernel sources to a standard location using the format: 'ln -s /usr/src/kernels/[current version] /usr/src/linux' $ ln -s /usr/src/kernels/2.6.32-220.23.1.el6.x86_64 /usr/src/linux Installation of package 'dkms' (It is important that you use the steps below to install 'dkms' in CentOS, which is the linux build for your Cloudera demo VM.) Steps to install rpmforge-release package to enable rpmforge repository Run Console $ mkdir rpm (create folder 'rpm' under 'home/cloudera' : /home/cloudera/rpm) $ cd rpm (change to 'rpm' folder: /home/cloudera/rpm) $ wget http://packages.sw.be/rpmforge-release/rpmforge-release-0.5.2-2.el6.rf.x86_64.rpm Install DAG's GPG key $ rpm --import http://apt.sw.be/RPM-GPG-KEY.dag.txt If you get an error message like the following the key has already been imported. error: http://apt.sw.be/RPM-GPG-KEY.dag.txt: key 1 import failed. Verify the package you have downloaded $ rpm -K rpmforge-release-0.5.2-2.el6.rf.*.rpmInstall the package $ rpm -i rpmforge-release-0.5.2-2.el6.rf.*.rpm This will add a yum repository config file and import the appropriate GPG keys. Now install package 'dkms' as root: $ sudo yum install dkmsNow you are ready to download and install 'VirtualBox Guest Additions'. Download 'VirtualBox Guest Additions' .iso image file ('VBoxGuestAdditions_4.2.6.iso') corresponding to your version of 'VirtualBox' installation (in this case Ver 4.2.6).
(Note: The following steps are unlike what is described in most of the posts on this topic.
I faced a lot of problems in making this happen using the steps described in these posts.
I therefore, recommend this method to avoid those issues.)
Open internet browser (Firefox) and download the following file (link below). Save file to folder
'Downloads' under 'home' (already created folder)
http://download.virtualbox.org/virtualbox/4.2.6/VBoxGuestAdditions_4.2.6.iso
Switch to 'root' user: $ sudo bash $ mkdir /mnt/ISO Once your folder is created go to the folder where ISO image 'VBoxGuestAdditions_4.2.6.iso is stored. $ cd /home/cloudera/Downloads Use command: ls to list contents of the folder. $ mount -t iso9660 -o loop VBoxGuestAdditions_4.2.6.iso /mnt/ISO $ cd /mnt/ISO $ ls (lists contents of the mounted 'VBoxGuestAdditions_4.2.6.iso' image) 32Bit cert VBoxSolarisAdditions.pkg 64Bit OS2 VBoxWindowsAdditions-amd64.exe AUTORUN.INF runasroot.sh VBoxWindowsAdditions.exe autorun.sh VBoxLinuxAdditions.run VBoxWindowsAdditions-x86.exe Now install 'Guest Additions' for Linux guest by running the following command. $ sh VBoxLinuxAdditions.run Reboot virtual machine. This completes installation of 'Guest Additions'. (Note: Whenever you reboot, make sure there is network connection. Check the active network icon at the top right corner. If crossed out, click and enable network connection by clicking 'Auto eth0')Enabling network connection at start-up of virtual machine (CentOS)

I learned that the network connection is not enabled automatically at start-up.
This can be resolved by making the following changes.
Run console
Switch to root user
sudo bash
Create/edit the following file:
emacs /etc/sysconfig/network-scripts/ifcfg-eth0
This will open up this file in 'emacs' editor. (You will find it blank!)
Copy/paste the following into this file. (Hint: use Shift/Cntrl/V to paste!)
DEVICE="eth0"
HWADDR="08:00:27:FE:D5:10"
NM_CONTROLLED="yes"
ONBOOT="no"
Save the file.
Reboot and check if network connection is enabled at start-up (see above).
8. Installation of R First add the EPEL repository, then intall git, wget and R. Find the latest release of the EPEL repository (http://fedoraproject.org/wiki/EPEL) and update the url accordingly. $ sudo rpm -Uvh http://dl.fedoraproject.org/pub/epel/6/x86_64/epel-release-6-8.noarch.rpm $ sudo yum -y install git wget R 9. Set Hadoop environment variables so R can find them too! The following is specific for CDH4 Demo VM. $ sudo ln -s /etc/default/hadoop-0.20-mapreduce /etc/profile.d/hadoop.sh $ cat /etc/profile.d/hadoop.sh | sed 's/export //g' > ~/.Renviron 10. Installation of Rstudio server $ wget http://download2.rstudio.org/rstudio-server-0.97.248-x86_64.rpm $ sudo yum install --nogpgcheck rstudio-server-0.97.248-x86_64.rpm 11. Access Rstudio from the browser (you may use any machine in the home network) Check IP address by running command: $ ifconfigAccess RStudio from browser by typing the address (uses port 8787) : e.g., http://10.0.1.15:8787/ Both username and password are 'cloudera' Username: cloudera Password: cloudera12. Installation of RHadoop's rmr package First install the pre-requisite packages. (Run R as root to install system-wide) Run console. $ sudo R R> install.packages( c('RJSONIO', 'itertools', 'digest', 'Rcpp', 'functional', 'plyr', 'stringr'), repos='http://cran.revolutionanalytics.com')R> q() (to quit 'R' session) Download the latest stable release of rmr (2.0.2) from github. Run console $ wget --no-check-certificate https://github.com/downloads/RevolutionAnalytics/RHadoop/rmr2_2.0.2.tar.gz $ sudo R CMD INSTALL rmr2_2.0.2.tar.gz Test that 'rmr2' loads$ R R> library(rmr2) Loading required package: Rcpp Loading required package: RJSONIO Loading required package: digest Loading required package: functional Loading required package: stringr Loading required package: plyr R> 13. Testing with a simple example


small.ints <- to.dfs(1:1000)
out <- mapreduce(input = small.ints, map = function(k, v) keyval(v, v^2))
df <- as.data.frame(from.dfs(out))
Screenshot showing execution of above lines on RStudio:
